Gathering Your Supplies
Before you embark on the journey of drawing a Rose Hair Tarantula, it’s essential to gather the right supplies. Having the appropriate tools will not only make the process smoother but also enhance the final outcome of your artwork. This initial step sets the foundation for a successful drawing experience, allowing you to focus on the creative aspects without being hampered by inadequate materials. Ensure you have a well-lit workspace and a comfortable setting to fully immerse yourself in the drawing process. This guide simplifies the essentials, making it accessible for beginners while providing enough detail for improvement.
Pencil Selection
Pencils are the most important part of your arsenal. For drawing a Rose Hair Tarantula, pencils with varying hardness levels are highly recommended. Start with a range from 2H to 2B. A harder pencil (2H) is excellent for initial sketching and outlining, providing light lines that are easily erasable. Softer pencils (HB to 2B) are great for shading, adding detail, and creating depth. A well-sharpened pencil is crucial for precision, particularly when depicting the intricate details of the tarantula’s hair and features. Experiment with different pencil grades to find what suits your drawing style best. It is useful to have a mechanical pencil with 0.5mm or 0.7mm lead for fine details.
Paper and Surface Preparation

The type of paper you use can significantly influence your drawing’s appearance. For beginners, smooth paper is generally easier to work with, allowing for cleaner lines and smoother shading. Consider using drawing paper or mixed media paper, as these are versatile and work well with pencils. The paper should be of a medium weight to withstand multiple layers of shading and erasing. Before you start drawing, prepare the surface by ensuring it is clean and free of any smudges or debris. This will help your drawing look its best. You can also lightly tape the edges of the paper to your drawing board to keep it from moving during your drawing session.
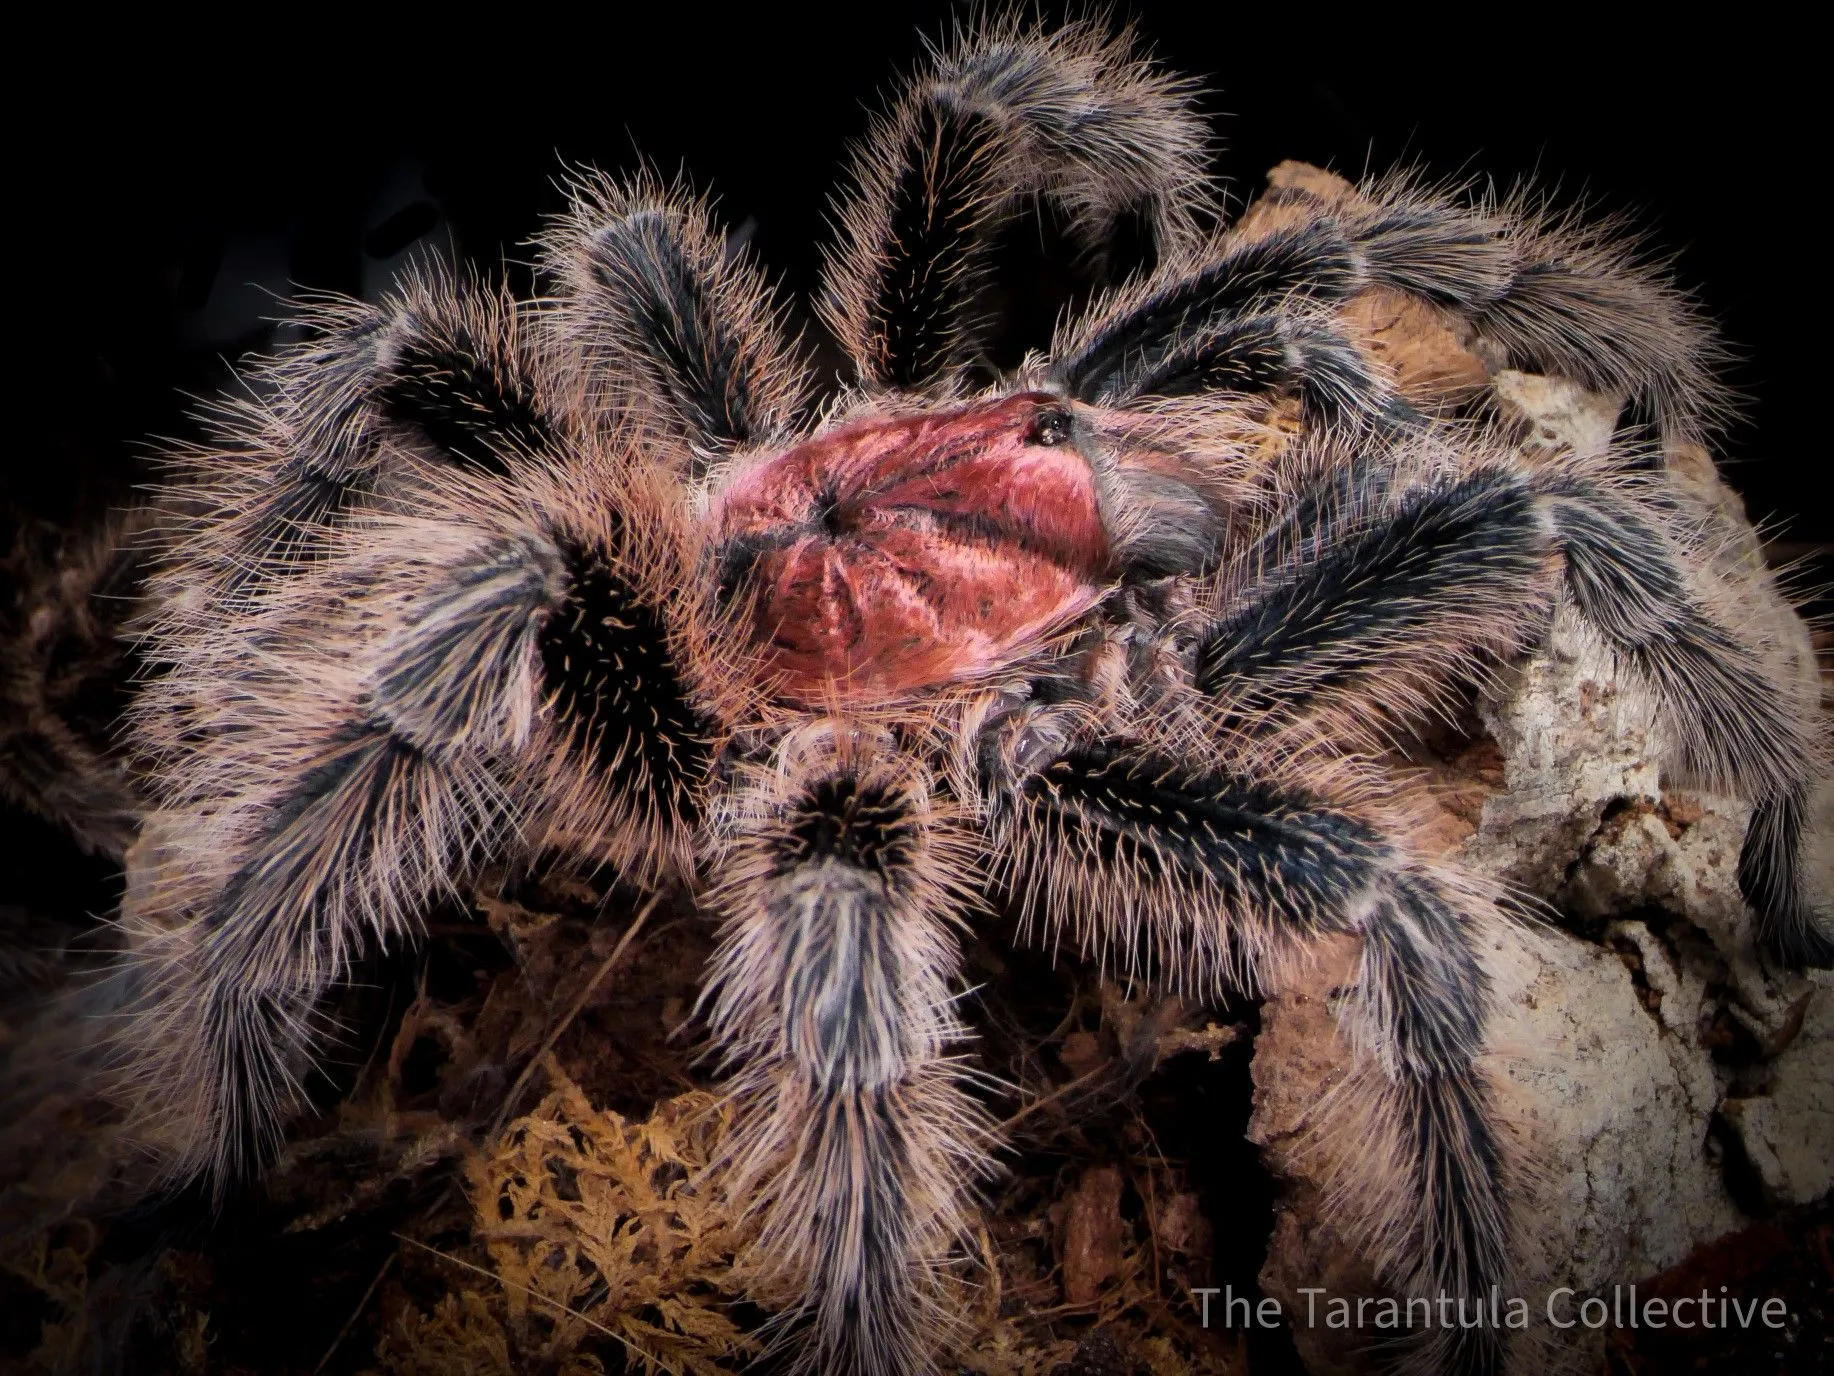
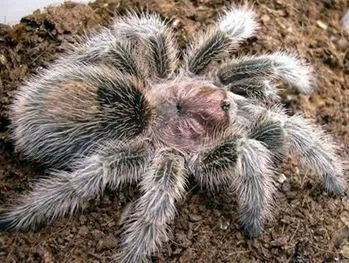
Reference Image [Rose Hair Tarantula]
A high-quality reference image is indispensable when drawing a Rose Hair Tarantula. Choose an image that clearly shows the tarantula’s body shape, leg structure, and hair texture. The reference should also provide good lighting, making it easier to understand the shadows and highlights. Consider different angles of the tarantula to add realism to your drawing. Using multiple references can be beneficial for capturing all the unique details. The more detail in the reference image, the more accurate your drawing will be. When selecting an image, make sure the resolution is high enough so you can see the finer details, particularly the hairs on the tarantula’s legs and abdomen. Consider printing the image for easy reference.
Basic Shapes and Sketching
Starting with basic shapes is a fundamental technique for creating any drawing, and drawing a Rose Hair Tarantula is no different. This stage involves simplifying the complex form of the tarantula into a series of basic geometric shapes to establish the correct proportions and overall layout. Start with the body, which can be broken down into oval or oblong shapes. Then, outline the legs, which can be simplified into long, tapering cylinders. This initial sketching phase is crucial for establishing the foundation of your drawing.
Creating the Body Outline

Begin by lightly sketching the main body of the tarantula. Use a light pencil (2H) to create an oval or oblong shape that represents the carapace (the head and thorax) and the abdomen. Focus on getting the proportions correct – the abdomen is generally larger than the carapace. Don’t worry about details at this stage; the goal is to establish the basic shape. As you sketch, lightly erase and adjust the lines until you are happy with the overall form. Remember, this is the initial stage; accuracy is key, but it doesn’t need to be perfect at this point. Use the reference image to guide your shape.
Leg Positioning and Proportions
Next, map out the legs. Tarantulas have eight legs, and understanding how they connect to the body and extend outwards is vital for realism. Lightly sketch lines to indicate the positions of the legs. Use the reference image to determine the leg’s angles and lengths. The legs’ proportions are critical for creating a realistic appearance. Sketch each leg with a slightly curved line to show its shape. Make sure that the legs are proportionally correct compared to the body, paying attention to the joints and how they bend. The correct placement of the legs will make your tarantula drawing look balanced.
Adding the Head and Chelicerae
Now is the time to refine the details of the tarantula’s head and chelicerae (mouthparts). The head, or cephalothorax, is the part to which the legs are attached. Sketch the basic shape of the head, taking note of the mandibles and the chelicerae. The chelicerae are prominent in tarantulas and will give your drawing a lot of character. Pay attention to the way the mouthparts are positioned, following your reference image. Add small lines to represent the fangs. Lightly sketch the eyes, which appear as small, dark dots at the front of the cephalothorax.
Detailed Drawing Process

Once you have the basic outline, move on to the detailed drawing. This is where you add the intricate textures, shadows, and highlights that bring your Rose Hair Tarantula to life. The detailed drawing process involves carefully studying your reference image and adding the specific features that make the tarantula unique. Take your time and focus on each part of the tarantula to ensure accuracy. Be sure to work systematically, moving from one area to the next to make sure the drawing remains proportionate throughout. The detailed drawing process is what separates a simple sketch from a realistic artwork, so embrace the complexities and enjoy the process.
Leg Detailing and Hair Texture
One of the most distinctive features of a Rose Hair Tarantula is its hairy legs. Start detailing the legs by adding the individual hairs. Use short, delicate strokes to represent the hairs, paying attention to the direction in which they grow. Vary the length and density of the hairs to give a natural look. The hairs are denser on the legs. Lightly vary the pressure on your pencil to give some hairs more emphasis than others. This will create a realistic sense of texture. This detail is essential to distinguish the Rose Hair Tarantula. Refer back to your reference image frequently to maintain accuracy.
Body and Abdomen Texture
Next, focus on adding detail to the body and abdomen. Rose Hair Tarantulas have a dense covering of hairs, especially on their abdomen. Use short, curved strokes to indicate the hairs, varying the length and density. The abdomen typically has a slightly darker color than the carapace. The carapace can have a smooth, slightly shiny texture. You can achieve this by adding subtle shading and highlights. Pay attention to the direction of the hairs and the way they catch the light. You will need to apply varying pressure with your pencil to create the different textures. Ensure that the abdomen’s shape and texture are consistent.
Adding the Eyes and Fangs

The eyes and fangs are essential features for the tarantula’s expression. The Rose Hair Tarantula has simple eyes. Carefully darken the small dots representing the eyes. Use a fine-tipped pencil to carefully draw the fangs, observing their shape and size from the reference image. They are typically sharp, curved, and slightly darker than the rest of the body. Pay attention to the way they are positioned. Take your time adding these fine details, as they contribute a lot to the realism of your drawing. Make sure that you do not overdo it and keep things realistic. This will give your tarantula drawing character.
Shading Techniques
Shading is a powerful technique that can add depth, dimension, and realism to your drawing. The shading techniques you use will depend on your drawing style and the specific features of the Rose Hair Tarantula. Shading can show the direction of light and create the illusion of depth and texture. Different shading methods can be employed, from simple hatching to more sophisticated blending techniques. Experimenting with different shading methods can significantly enhance the final appearance of your drawing. The key is to study your reference image and determine the areas of light and shadow.
Light Source and Shadowing
Identifying the light source is the first step in effective shading. Observe your reference image to determine where the light is coming from. This will dictate where the highlights and shadows fall on the tarantula’s body. The areas facing the light source should be lighter, while the areas away from the light source should be darker. Shadows will give your drawing depth and realism. Pay close attention to the way the light interacts with the hairs and the body’s contours. Use subtle shading to indicate the highlights and shadows, giving the impression of volume. Use a soft pencil for the shadows to add depth.
Blending and Smoothing

Blending and smoothing are essential for creating a realistic appearance. This technique softens the edges and transitions between light and dark areas, giving a more realistic look to the hairs and textures of the tarantula. After you have established your initial shading, use a blending tool (such as a blending stump or your finger) to soften the lines and create a smooth transition. Blend the shading to soften the edges of the highlights and shadows. Practice blending techniques to make your shading look more natural and accurate. This can include using a blending stump, soft cloth, or your finger. However, be careful not to smudge your drawing.
Creating Depth and Dimension
To create depth and dimension, vary the intensity of your shading. The areas closest to the light source should be lighter, while the areas further away should be darker. Use multiple layers of shading to build up the shadows and highlights, creating a sense of three-dimensionality. Use a range of pencil grades, from soft to hard, to enhance the shading. Vary the pressure you apply with your pencil. Darken the shadows under the legs and around the body to create a sense of depth. Remember to consider the position of the light source and how it affects the shadows and highlights on the tarantula.
Final Touches and Refinement
After completing the shading, it’s time to add the final touches and refine your drawing. This includes adding color, enhancing the details, and making any necessary corrections. This is your chance to polish your work. Review your drawing as a whole and make any adjustments necessary. Small details can make a big difference. Refining the details is key to bringing the drawing to life and making it stand out. Take a step back and see how the drawing looks as a whole.
Adding Color
While Rose Hair Tarantulas are primarily shades of brown, adding subtle color can enhance the realism of your drawing. Use colored pencils or markers to add realistic tones. Start with a base color and build up the layers gradually. The Rose Hair Tarantula’s colors vary. Some are more reddish, while others are more brown. Focus on the body’s colors and the legs. Blend the colors to achieve a smooth transition. Avoid harsh lines and aim for a natural appearance. The use of color can enhance the detail. The body and legs are often different tones. Consider a dry brushing technique to add some texture to the hairs.
Background and Environment
Adding a background and environment can significantly improve your drawing. Consider the environment in which a Rose Hair Tarantula lives. A simple background can provide context and make your drawing look more complete. The background does not need to be complex. You could add some subtle hints of vegetation, such as leaves and twigs. Adding a soft, blurred background can help the tarantula stand out. This is an easy way to add depth. The background should be secondary to the main subject.
Finalizing and Review
Once you have added color and completed the background, review your drawing. Step back and look at your work from a distance to see if the proportions and shading look correct. Make any final adjustments to improve your drawing. Once you are happy with the results, consider signing and dating your artwork. Examine the drawing for any details you might have missed. A good drawing will have a few layers of shading, and the textures will be well represented. It is good to step away from your drawing for a while. Then, come back with fresh eyes and make any needed corrections.